
MS Outlook stores your mailbox data in two different file formats OST and PST – depending on the account type and configuration. One of most commonly used file formats is the OST file – also known as an Offline Storage Table file.
This data file is automatically created when you configure your account with Exchange Server, Microsoft 365, or IMAP account.
This Outlook data file allows you to access all your mailbox items even when you are not connected with internet connection. Outlook synchronizes the changes with the mail server automatically when your network connection is restored.
At times, situations arise where you need to convert OST to PST. Some common situations include:
- When you need to create a mailbox backup
- Transfer Outlook data to another computer
- Access emails after Outlook profile deletion
- Recover mailbox data from inaccessible accounts
- Archive old mailbox items
In this post, we will explain the stepwise methods of converting the OST file to PST for free.
Methods to Convert OST File to PST for Free
Below we have mentioned the methods that can help you to convert OST file to PST format.
Method 1: Use Outlook Import & Export Wizard
You can use the Import/Export wizard in Outlook to convert OST to PST for free. However, this method works only when your profile is active and connected to the mail server. Here’s how to convert the file using this feature:
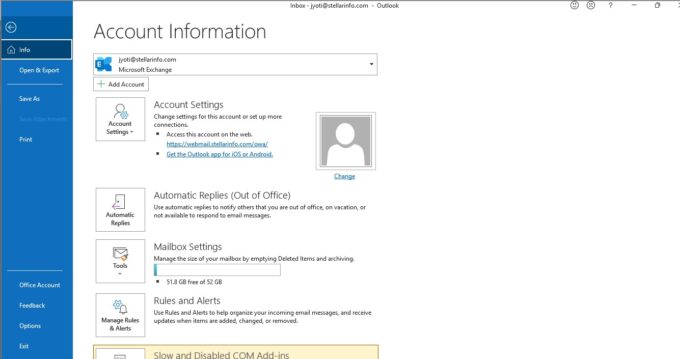
- Open Outlook.
- Go to File > Info.
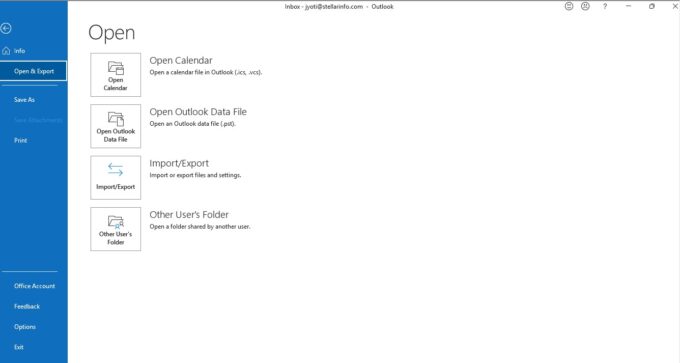
- Select the Open & Export option.
- Choose Import/Export from the given options.
- Now, click on Export to a file option.
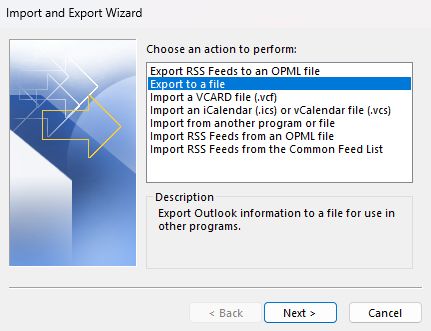
- Click Next.
- Choose Outlook Data File (.pst).
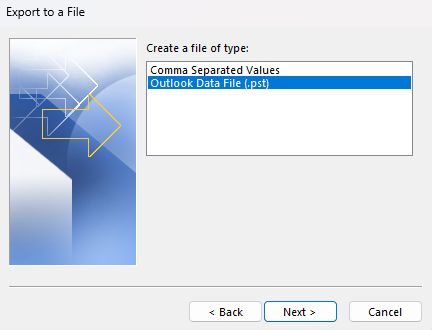
- Click on Next.
- Select the mailbox or the folders to export to PST file.
- Click on Browse and choose a desired location to save the PST file.
- Click on Finish.
Method 2: Using Archive Feature
You can also use the Archive feature in Outlook for converting OST to PST. This feature is basically used to move older emails or other mailbox items to a PST file. Here’s how to use this feature:
- In Outlook, go to File > Info.
- Click on the Cleanup Tools.
- Choose Archive.
- Choose the “Archive this folder and all subfolders” option.
- Then, choose the folders you want to archive.
- Specify a date under Archive items older than.
- Click Browse to choose a location to save the PST file.
- Click OK to start the process.
Method 3: Using Drag and Drop Method
By using this method, you can manually move mailbox folders or emails into a newly created PST file. However, it is time-consuming and is useful for selective mailbox export. Here’s how to do so:
- In your Outlook, go to the Home menu.
- Click New Items > More Items.
- Click on Outlook Data File to create a new PST file.
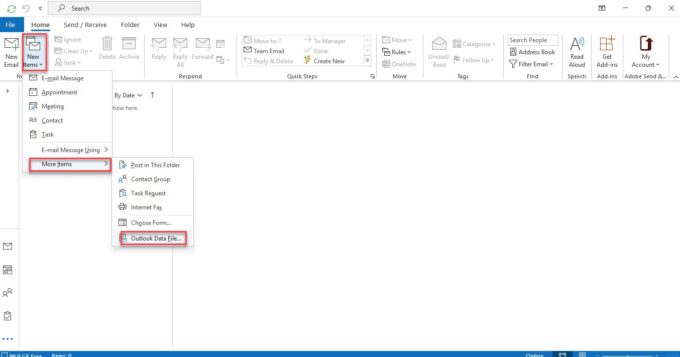
- Name the PST file (e.g., xyz.pst) and specify a location/folder.
- Click OK.
- Now, this file will appear in your folder pane as a new mailbox.
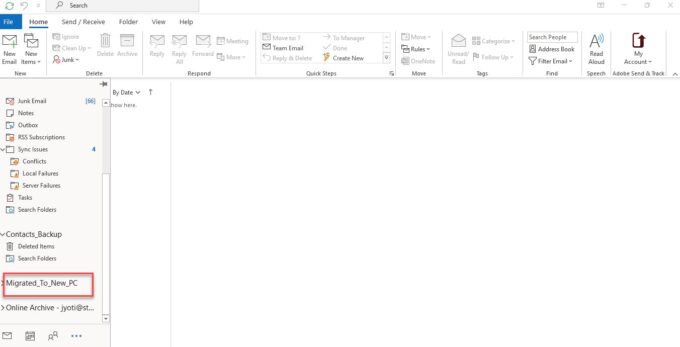
- Now, drag and drop the mailbox folders, such as Inbox, Sent Items, or custom folders, from OST file into this file.
Method 4: Use Free OST to PST Converter Online
The above-mentioned manual methods for OST to PST conversion can only work when your Outlook profile is active. If not, then you need to use a free OST to PST converter online. It is one of the fastest and easiest ways for OST to PST conversion.
Online OST to PST Converter by Stellar is a powerful converter which is designed to convert orphaned, inaccessible, or offline OST file of up to 500MB for free.
Additionally, you can track real-time conversion progress. It also ensures data privacy and security as the uploaded OST file and the converted PST file are deleted from the server within 24 hours. However, if your OST file is larger than 5 GB then you should opt for the desktop version of this tool – Stellar Converter for OST.
This tool can convert your OST file to PST without any size limit. Also, you can convert your OST file in multiple formats such as: EML, PDF, RTF, etc.
Here’re the steps to use this tool:
- Open a web browser, like Chrome or Firefox and visit the official website.
- You need to sign up before starting conversion.
- Once you signed up, click on Upload OST File.
- Find and select the OST file (<500 MB).
Note: If you’ve a large OST file (up to 5GB), then upgrade to the Premium version.
- Then, click on Open and wait until the file is uploaded.
- Click on Start Conversion. Wait for the conversion process to complete.
- Now, select Save PST file.
You can go to the Downloads folder on your system and check the PST file.
Conclusion
Above, we have discussed free methods to convert your OST file to PST. The manual methods only works when your Outlook profile is active and your OST file is accessible. If this is not the case, you can take the help of Online OST to PST Converter by Stellar. It can quickly convert OST file of less than 500 MB into PST format absolutely free. If your OST file is large, then you can opt for its premium or desktop version.
![10 Best Download Manager for Mac [Free Downloaders] – 2025 Guide](https://www.digitalcare.top/wp-content/uploads/2019/03/Snap8-211x150.png "10 Best Download Manager for Mac [Free Downloaders] – 2025 Guide")
![How to Remove Mackeeper From Mac [No Traces Left] – 2025 Guide](https://www.digitalcare.top/wp-content/uploads/2019/08/3-1-211x150.jpg "How to Remove Mackeeper From Mac [No Traces Left] – 2025 Guide")